Overview
The JigCell Comparator is an integrated package of Java tools for performing a quantitative analysis on a collection of data sets. You can find more details about the Comparator on its project page. In the Dashboard, the Comparator works with a simulator to perform a collection of experiments on a model and report back the results. All of the action occurs in the normal Comparator interface. The Comparator allows its services to be used over OAA, supplying each one as an OAA solvable. This Dashboard analyzer uses those services to load the data files needed for a comparison, and then starts executing. The steps it goes through are the same as a user does in the normal Comparator interface.
Building from Source
Note: you can skip this section if you just want to install and use the JigCell Comparator Analyzer.
The source code for the JigCell Comparator Analyzer is included with the rest of the source for JigCell. Unlike the normal JigCell build process, building the JigCell Comparator Analyzer requires you to have Apache Ant installed.
- Download and install the BioSPICE Dashboard
- Update the Dashboard to the latest version
- Download and install the JigCell source code and unpack it
- Download the JigCell Comparator Analyzer build script
- Copy the build script you downloaded to where you've unpacked the JigCell source code
- Edit the build script and change the dashboard_home property to the location where you've installed the BioSPICE Dashboard
- Run ant -f build.xml jars to create the analyzer jar file
Installation
Using the JigCell Comparator Analyzer requires the BioSPICE Dashboard and a regular installation of JigCell.
- Download and install the BioSPICE Dashboard
- Update the Dashboard to the latest version
- Download and install JigCell
- By default, JigCell applications expect to use an OAA Facilitator located on your local machine. If you want to use a remote facilitator, edit the setup.pl file present where you installed JigCell.
- Download the Comparator configuration file for the Dashboard
- Copy the configuration file over top of the compare.config file present where you installed JigCell
- Download the JigCell Comparator Analyzer or build it yourself as described above
- Install the analyzer in the Dashboard
Data Files
A total of nine files are needed to use the Comparator in the Dashboard. Three of the files are Comparator data files- the experimental data, transforms, and objective functions. Five of the files are Run Manager data files- the set of runs, the basal parameter and initial condition sets, and the parameter and initial condition sets used by the runs. The final file, the model, comes from the Model Builder or another SBML provider.
| File | Purpose |
|---|---|
| Model | Biochemical reactions that describe a process. |
| Run set | A collection of simulations that can be performed using the model. |
| Basal parameter set | Default values for each parameter in the model. |
| Basal initial condition set | Default values for each initial condition in the model. |
| Parameter sets | For each run in the run set, the changes to the parameters specified by the experiment. |
| Initial condition sets | For each run in the run set, the changes to the initial conditions specified by the experiment. |
| Experimental data | Collected data about the real world behavior of this system. |
| Transforms | For each experiment, a step-by-step procedure that replicates the experiment using the model. |
| Objective functions | For each experiment, a procedure that measure how far the model is from the real world result. |
Included with JigCell are a set of sample data files for a frog egg model. These data files are used for testing JigCell and can also be used to test the analyzer.
Using the Analyzer
- Start the BioSPICE Dashboard
- Start the OAA Facilitator
- Start the JigCell Comparator
- Start the XPP simulator
- In the Dashboard, enable the OAA Bridge to allow OAA agents to be used as analyzers
- Create a workflow using the JigCell Comparator Analyzer or load an existing workflow that uses it
- Run the workflow
To create a workflow in the Dashboard, you will need to have made the nine data files described above in advance. Create a document for each file and connect it to the JigCell Comparator Analyzer. Note that model files normally have a .sbml extension in JigCell but will need to have a .xml extension to be used by the Dashboard.
In addition to specifying the files, you will also need to give a name for your model and run set file. These names must match the names used in the other data files. For the example frog egg model, the model file name is models/frogegg.sbml and the run set file name is frogegg.run. You can enter these names by double clicking on the JigCell Comparator Analyzer in the workflow and using the parameter editor.
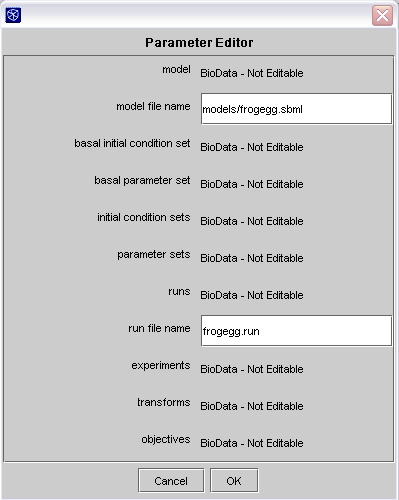
Parameter editor in the Dashboard
If you installed JigCell on Windows, you can use this example workflow for the frog egg model. After loading it, the workflow should look like this and be ready to run.

Dashboard workflow for frog egg model